

Hello all you lovely Peeps, I have a little project to share which after finishing thought it might be useful to do a tutorial as there are always new crafters in blogland, so I have made a start on another and took a few photos along the way.

I know the shape is not a new concept and it's years since I used it in a class, but it sort of came back into my mind the other night when trying to think what I could do to keep my crafty mind occupied until I can stamp again properly. And Ignacio's lovely Nicecrane Christmas images are perfect, I used images from the Old Merry Christmas and Adorable Christmas sheets.
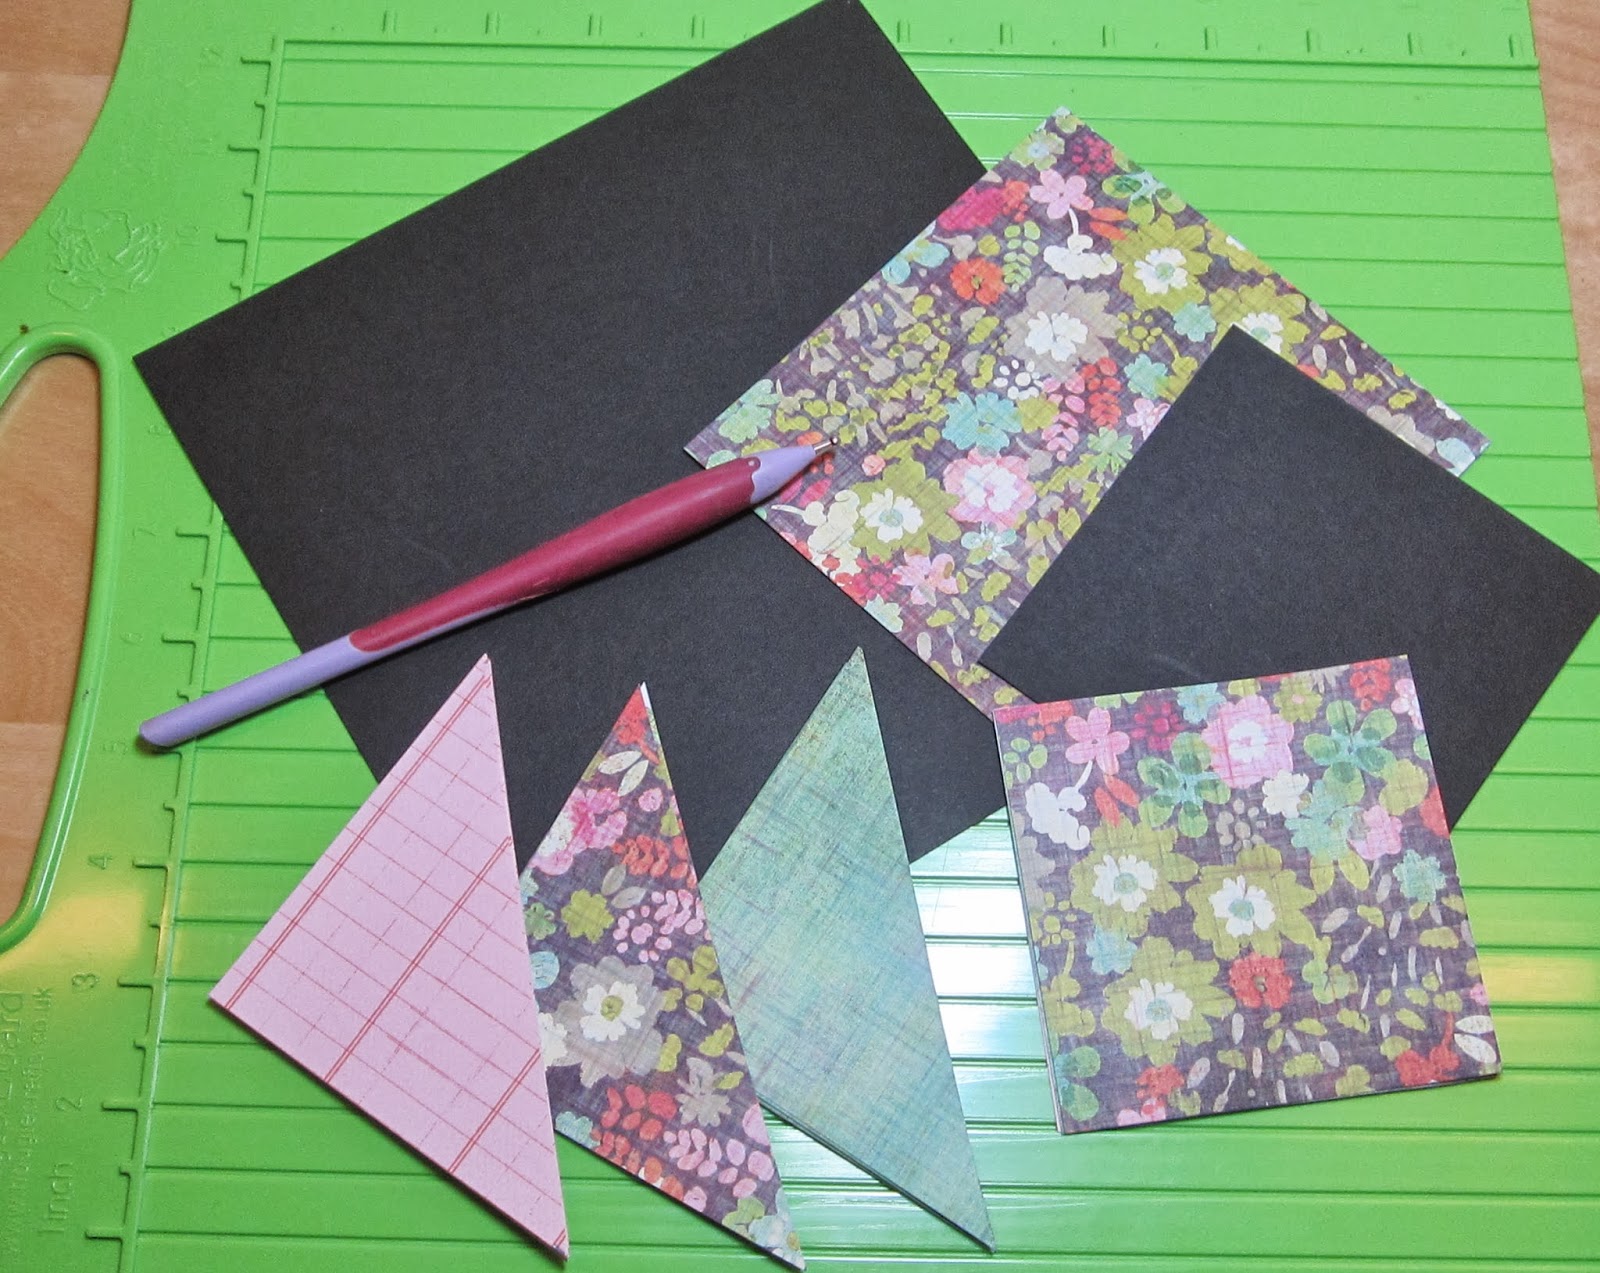
Cardstock: Three 8"x8" pieces 220/250gsm for the main card and two 4"x4" pieces of a heavy weight for the front and back panels.
Coordinating DP's: Two pieces 5"x5" for front and back panels, ten 3.5" squares, four left whole and six cut diagonally.
Scoreboard and scoring tool, glue and choice and images, ribbons etc., to decorate.
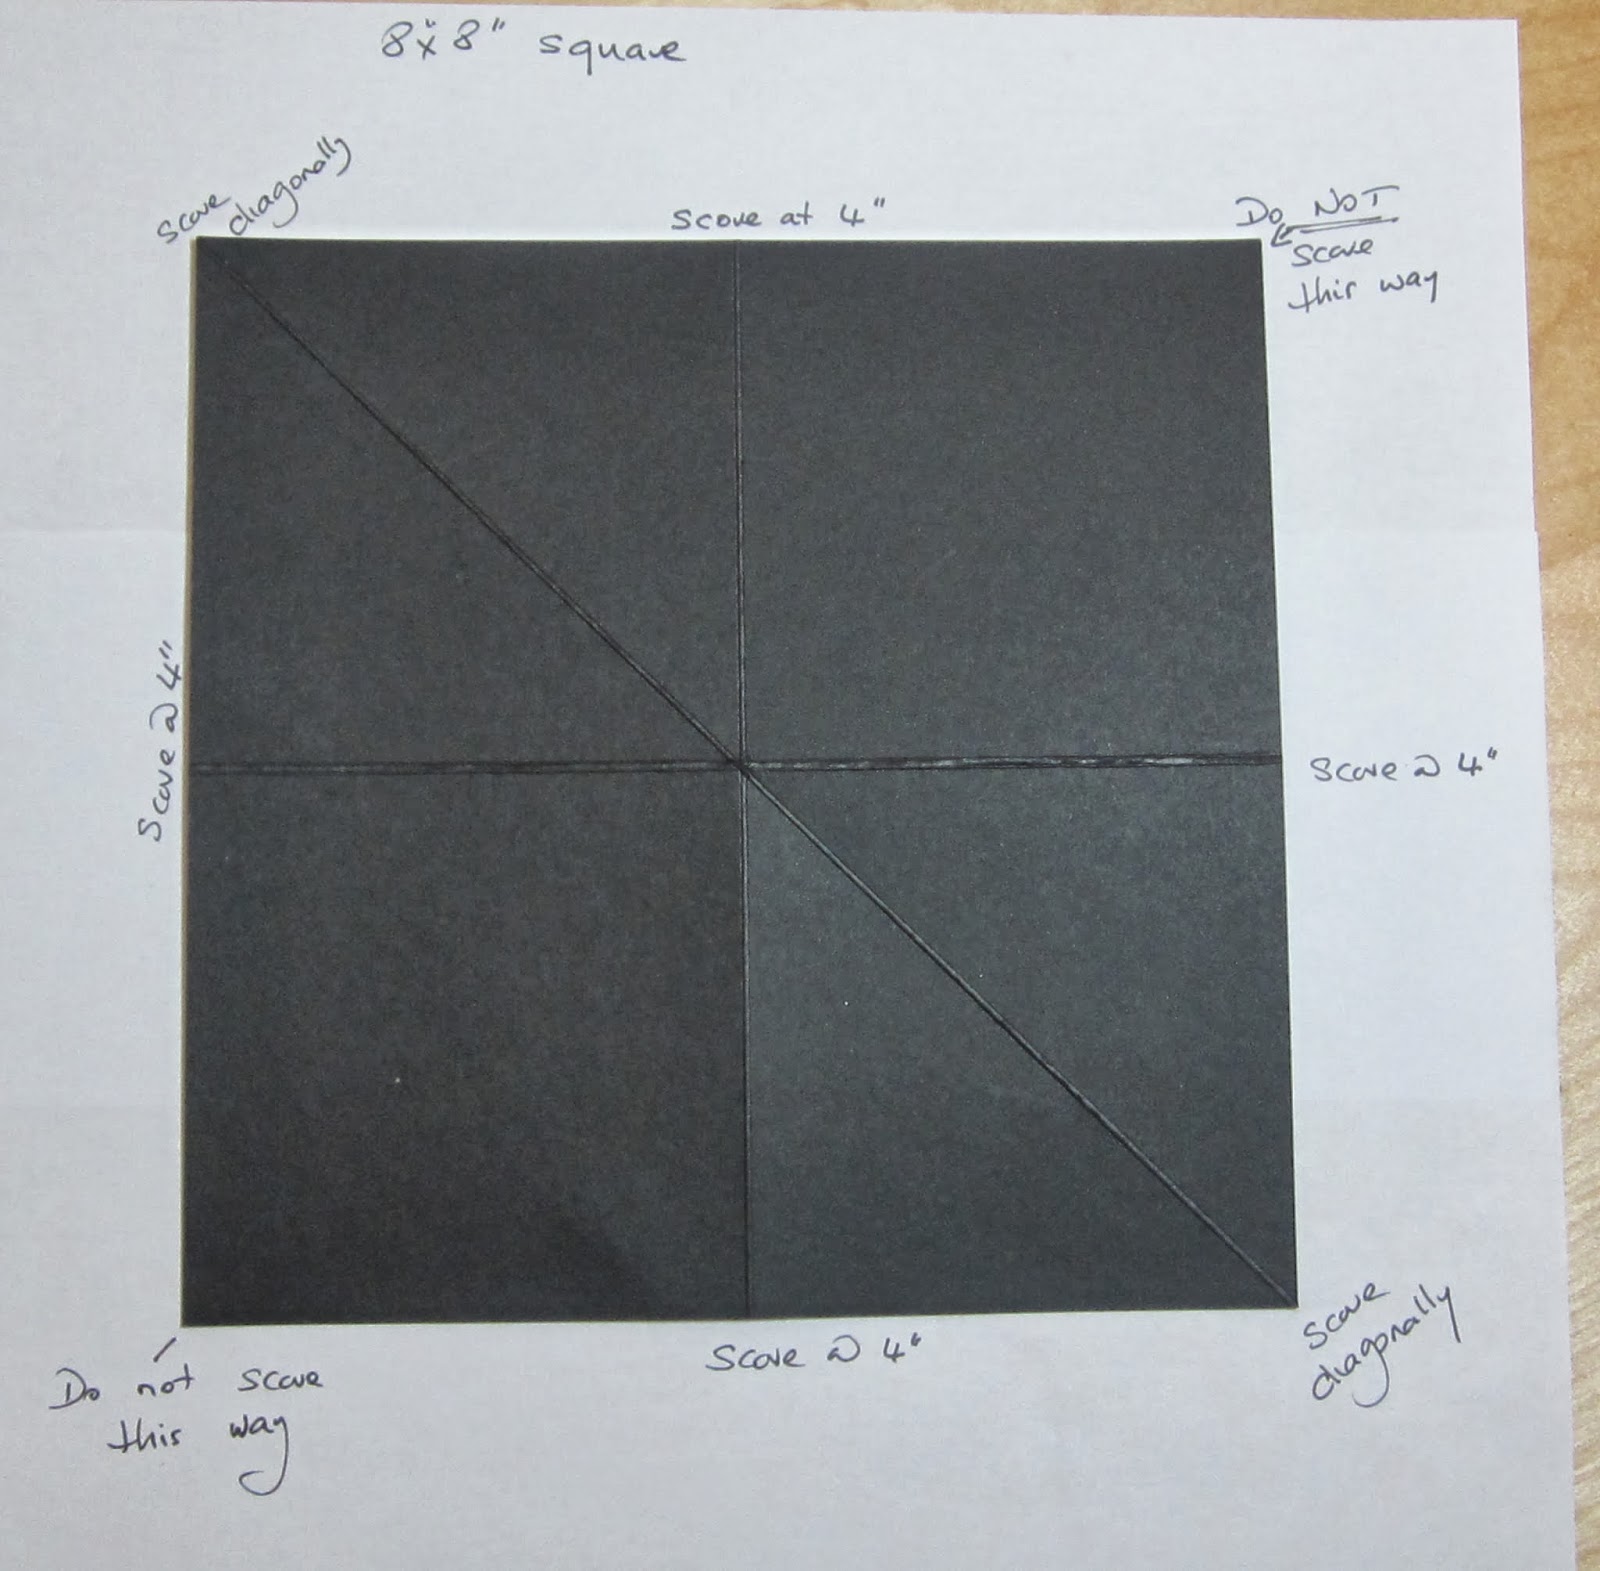
Score each 8"x8" square as indicated above I have made the photo's large in the hope you can read the directions and my current appalling writing - things can only get better

Glue the three pieces together as indicated above

Now fold each scored line both ways to make the whole piece more flexible and then into the finished shape

This is how I deal with my box lids and the same process works for this project and below the finished panel ready to be adhered to the main piece. And finally add all the internal square and triangle DP's sections and decorate.

I am not totally convinced my explanations are clear so please do mail me if you want to check on anything.

fab tutorial thank you definitely one to try.
ReplyDeleteIts been yonks since I've made on of these Brenda, thanks ever so for reminding me how fab they look!! xx
ReplyDeleteWow Brenda, a long time since I did one of these, yours looks lovely, xxxx
ReplyDeleteI can't wait to try this! I haven't seen it before as I am not that long into the paper crafting world. Thanks so much for the tutorial. Hugs, Robin
ReplyDeleteThis looks fantastic, Brenda. I love all the papers and images you've used. These little tags are adorable in it. Thank you for the tutorial. I'd love to try it some day!
ReplyDeleteHugs,
Eret
Спасибо!!
ReplyDeleteLove it Brenda,,,I am a origami fan,,and I was able to fold the card,,,,.but I assume at the end you added two panels to your folder card,,,,,,,apart. I need takea look to the reverse of your card to understand completely it,,,,,,,,I am not sure about how you did these latest two panels,,,,because Santa image is not on front,,,so I assume it is on the back panel........
ReplyDeleteOhh this is brilliant thankyou for the tutorial.
ReplyDeleteWhat gorgeous cards, they look very involved. Thanks for the tutorial :o)
ReplyDeleteJackie xx
WOW!! Such a fabulous design, I will be giving this a try sometime. Thank you for sharing
ReplyDeleteSue xx
Looks very difficult but yours is fabulous!! Great make!
ReplyDeletexxx Marianne
thanks for the tute Brenda !!
ReplyDeleteThank you, Brenda! I have not made one of these for a long time - completely forgot about it. Your concertina card is beautiful! hugs, de
ReplyDeleteFabulous tutorial!! Thanks for sharing :)
ReplyDeleteGorgeous project Brenda, I've not made one of these for ages, may have to have a go at one again for DH's Xmas card. I also think I have got to get me either a Hougie or some other good brand scoring board. The one I have only scores for certain sizes of cards, oh well another thing to add to me list lol! Try not to do too much xx
ReplyDeleteWOW….was my 1st reaction when I saw this card! I'm speechless ....this is such an eye catcher! This would be an awesome gift!
ReplyDeleteTh♥nks for your great tutorial! You have explained your tutorial so simply that everyone, anyone could follow it, even me.
greetings Regina
Brenda tis is such a fabulous design...lovely your way you've decorated it....thanks for the tutorial..
ReplyDeleteAnne
I've seen it once somewhere and left it for better times to make. Thank you for the tutorial. I think I'll finally make one =)
ReplyDeleteHi Brenda !! It is Fab!!! I understood everything...the pictures are really good for helping us with the SBS !!!! Thanks for your ideas!!!!!!
ReplyDeleteLooks amazing - thanks for the tut!
ReplyDeleteA brilliant project and fabulous tutorial Brenda - Thank you!
ReplyDeleteLorraine x
Looks like it wasn´t that simple to make... But the result is beautiful! Hugs, Gerrina
ReplyDeleteGorgeous! I did one of these when our last head retired. very useful to have the little panels to write on when there are lots of people x
ReplyDeleteWow, this is amazing. Thank you for sharing the tutorial.
ReplyDeleteThanks for the fab tutorial
ReplyDeleteRosie x
Beautiful project Brenda, looks a bit complicated for my brain which is not functioning at its best at the moment lol. Hope you are soon well enough to be stamping again, take care x Susan x
ReplyDeleteI have not seen this before, it is great, will have to give it a try, thanks for the tutorial.
ReplyDeleteKath x
oh hun,this is brilliant just love,it,super tutorial too,hun,hope you will be back to stamping soon sweetie,thanks for sharing hugs Cherylxxxxx
ReplyDeletegreat tutorial Brenda - I don't think I've ever done one of these! Must give it a try! Hugs rachel x
ReplyDeleteBrenda the correct title is Squash Book/Card,,,, I have just seen a grogeus tut,,at You Tube,,,,wow,ww,owwwwwww,,,,I can do it, now,,,,,yiiiiiiiiiiiiiiiiiiiipeeee.
ReplyDeleteDon't worry - your writing is perfectly legible & the instructions seem clear to me. The photos help enormously with the explanation too. Thank you for taking the trouble to do this. Take care & let's hope that you're soon able to stamp again. In the meantime it's brilliant to see you still creating.
ReplyDeleteMuch love
Paula (PEP)
Stunning creation Brenda...the papers are perfect and thanks for all the directions. Have added to my to do list one day.
ReplyDeleteBeautiful creation ! I love it. I would love to try one sometime, so I've pinned your great tutorial. Take care, Shirleyx
ReplyDeleteLovely traditional images and fab shape, thanks for the tut too
ReplyDeleteGorgeous project and super tutorial Brenda.
ReplyDeletePat xx
nice one.. thanks for the tutorial... shd try it out..
ReplyDelete-Berina
Moxie Craftie
What a gorgeous project; I love that shape!! Hugs Frea
ReplyDeleteThat's a fantastic project, thanks for the tutorial. :)
ReplyDeleteWonderful Brenda. Thanks for the tutorial. I have never tried one of these before so this is definitely on my to try list now.
ReplyDeleteMags
x
Popped over from Nicecrane Designs. Wonderful Tutorial Brenda. TFS. The finished project is amazing.
ReplyDeleteFlorence x
Popped over from Nicecrane Designs. Wonderful Tutorial Brenda. TFS. The finished project is amazing.
ReplyDeleteFlorence x
Popped over from Nicecrane Designs. Wonderful Tututorial Brenda. TFS. The finished project is amazing and inspiring.
ReplyDeleteFlo x
Oh Brenda I haven't seen one of these for years. How fantastic and your tut is brilliant. Ignacio's images are perfect to use x
ReplyDeleteFabulous tutorial! Ruby x
ReplyDeleteBeautiful projekt :) Thanks for the tutorial
ReplyDeleteGreat tute Brenda, love this idea! and I really love all the awesome christmas papers and images, great gift idea for Chrissy! Not long to go now! I must get to writing and addressing those cards and envelopes!
ReplyDeletewygląda na skomplikowane ale dzięki Tobie juz nie . POzdr
ReplyDeleteBeautiful and the directions seemed really clear to this addled brain!! lol
ReplyDeleteHi Brenda, just had a lovely catch up of your gorgeous Christmas makes. Thanks for sharing this - I haven't done one of these for ages, really must try one again.
ReplyDeleteAvril xx
Thanks for this tutorial :)
ReplyDelete