
 Basic materials: Ink, preferably two shades of the same colour ink or similar colourways to add definition and to help build the image. For a moon a blue and silver work well. I always use either Tim Holtz distress inks or a chalk based ink such as the Hero range. Make up sponge and your mask which is a piece of paper or card with a circle punched out.
  Lay your mask over the piece of card you want to use for your project. Take the make up sponge and roll into your fingers as shown below. By rolling it you avoid any edges and will get a smoother finish without any harsh lines.
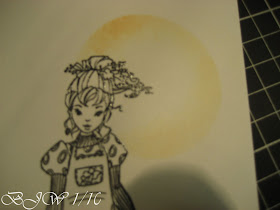
 Tap the rolled sponge into the lightest colour ink first, dab onto a piece of scrap paper first to remove excess ink, then tap gently round the edges of the circle, slightly firmer near the edges - I never go right into the centre of the circle with ink as this gives a more graduated finish (example). Follow the same process with the darker ink until you are happy with the shading.
 Lift the mask off, allow to dry for 5/10 minutes, or give a blast with your heat gun, then you are ready to stamp your images.
 The next technique takes it a step further as you create a mask for your sun/moon and image. This is useful if you want to use very light colours for colouring your image as there is no underlying colour to conceal.
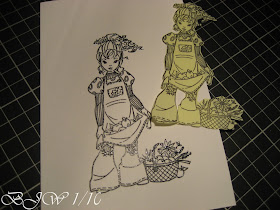 Stamp (and emboss if you wish) your image onto a piece of good quality cardstock. Stamp it a second time onto a post it note, piece of paper or if you are really posh masking paper !

Cut our the second image and lay it over the main image, then lay your mask (sheet of paper with the circle cut out) over the image where you want to see the sun/moon. Follow exactly the same process as the first technique above. Lift of both the circle mask and the main image one and you are left with the sun/moon behind your image.
Basic brayering technique. There is no limit to how far you can take brayering and some wonderful effects can be created, but here I will stick to the sun/moon again with a few hills thrown in for good measure.  Basic materials: Ink pad, big and juicy are by far the best as apart from the blend of colours, they are large enough to accommodate the brayer - I always use a speedball brayer as they are soft and give a nice even finish. A circle - paper rather than card is best as it is less likely to give off shadows as you roll the brayer across. Non permanent glue. Gloss cardstock - in my view essential as a matt cardstock can absorb the ink, is harder to work with and is less likely to give an even finish.
 Once you have removed the excess you need to do a wheelie - assuming you are starting to brayer the top half of your piece first (and right handed) you will need to do the wheelie on the left hand side of the brayer. This removed the ink from the edge and will prevent lines in the middle of your cardstock.
 Gradually build the colours up with light movements drawing the brayer towards you. When you are happy with the colour, turn your cardstock round so the bottom becomes the top temporarily (there will be no ink on that part yet) then continue with the same process and you will end up with graduated colours over your whole piece.

Next tear a piece of plain paper, lay it over your brayered piece, ink up your brayer again and remove the excess and brayer more ink across the top of your piece of cardstock (part of your brayer will be inking the piece of paper). Move the paper down and repeat and you will see your hills building.

This picture is pretty poor as I did the photos under my daylight lamp, but the hills are just visible. These are clearer.
 Remove the mask from the sun/moon. Scrunch up a piece of plain paper, ink up your brayer, take off the excess ink, do a wheelie on the left side again then roll with a fairly hard movement over the piece of scrunched up paper. Run the brayer over the top half of the card and you will create a clouded effect over the sun/moon - just about visible in the picture. The same technique gives great water effects if you want to create water/sea (see here).
I really do hope this makes sense, not the easiest thing to explain on paper, so as always any questions just yell.
Wow Brenda, thank you very much for the lovely tutorial and the ideas!!!
ReplyDeleteHug Celia,
Lovely tutorial Brenda. Thanks for taking the time to give us the benefit of your experience.
ReplyDeleteLesley Xx
This is great, Thanks so much!!!
ReplyDeleteMore materials I have to buy ;)
Oh that's so clever - I now need a brayer lol!
ReplyDeleteLesley x
Great tutorial Brenda - thank you so much for taking the time to do it for us. I think a lot of practise is needed to get it just right but we hope to get there lol
ReplyDeleteLove Lynda xxx
Fabulous tutorial Brenda, well done with love and hugs Shirleyxxxx
ReplyDeleteOh' A Big Thank You for taking your time to do this and share this fab Tutorial with us many xxxx Hugs xxxx
ReplyDeleteSarah xx
Super tutorial. Thank you for the hard work
ReplyDeleteLove Sarah XXX
Really well done Brenda. Thank you for sharing. hugs, eileen
ReplyDeleteBrilliant tutorial Brenda, have the inks so will try that one but no brayer yet.
ReplyDeletePinky
You do it so welll Brenda.with love chris xxx
ReplyDeleteHi Brenda, this is so helpful..I have done similar but the bit with using 2 different colour's is definitly a new one for me...
ReplyDeletethank you so much for taking the time to share this...
I will be taking lot's of new helpful hint's from you for my next card...so thank you ever so much...
x
Vicky
Beautiful, Thank you for sharing!
ReplyDeleteThank you, especially love the tip about the makeup sponge
ReplyDeleteThanks for this Brenda - always helps to know where you can click to get the info.
ReplyDeleteBeryl xx
Another wonderful tutorial! What colour fingers did you end up with?!
ReplyDeleteYour a Gem ! my friend was just asking me about this today. You are wonderful taking the time to do this for us. As always very grateful. Mel xxx
ReplyDeleteThanks for sharing...great tute!
ReplyDeletexoxo
Dear Brenda, many thanks for the great tutorial...great idea, love it! Hugs and happy day!!!
ReplyDeleteGreat tutorial Brenda and thanks for taking the time to create and share it with us.
ReplyDeleteWell done.
Pat xx
brilliant thanks i cant wait to try this out xx
ReplyDeletefab tutorial great for a newbbie crafter like me.
ReplyDeletehugs Clare x
what a great tutorial!!!! this is brilliant-thank you soooooooooooo much!
ReplyDeletexoxo
sarabeth
Fantastic tutorial! I'm going to go and try to do that sun right now!!
ReplyDeleteOMG your tutorial is brilliant and your so clever with your techniques. But i knew this it shows in all your creations. I'll definately becoming back to this tutorial.
ReplyDeleteHappy crafting
Tracy x
Great tutorial! Thank you so much for sharing! Warmest wishes, Lesley
ReplyDeleteGreat tutorial I have been using these techniques but even I picked something new up (the wheelies) B4 brayering so simple but will make a big difference next time I do some thanx brenda
ReplyDeleteLove Dawn xx
FANTASTIC!!!!! I need to go shopping for supplies now! TFS Julie.x
ReplyDeletebrilliant tutorial, I cant wait to try this.
ReplyDeleteBecky x
Great tutorial! Thanks for sharing :)
ReplyDeleteThanks for the wonderful tutorial. Beautiful work.
ReplyDelete